
You may find that you need to add an action to your existing call flow, not at the end of a branch but somewhere in the middle. For example, your existing call flow does not make use of an Override action, but now you want to start off with an Override, while preserving the structure of your existing call flow.
To insert an action:
The procedure for inserting an action is best explained by example. In the following scenario, we build on the example in the Reusing an Action topic. Assuming the following call flow, we will insert an Override action between the When I receive a call and Transfer to Bob actions.
Click When I receive a call. Note that the New Call result is the Supervised Transfer: Transfer to Bob action.
In the Results area, click the Supervised Transfer: Transfer to Bob link.
From the New Actions menu, select Override as the new action type.
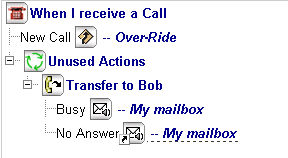
The new action item is added to the Call
Flow display area and the new Override action is assigned to the New Call
result. The entire call flow is moved under Unused Actions as follows
(you may need to click the ![]() sign
on the left of the call flow to expand the collapsed branches):
sign
on the left of the call flow to expand the collapsed branches):
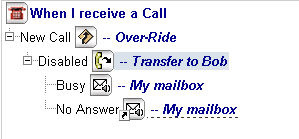
Click on the new Override action, and then on the Disabled result link.
Click on Supervised Transfer:Transfer to Bob. This will assign that action to the Disabled result of the Override action.
The call flow is re-created under the Override action’s Disabled result and now appears as follows:
Assign actions to the Enabled result of the Override action as required. (These are typically a Message action followed by a Voicemail action.)
Click the Save button to save the call flow changes.